How to Setup Account on 3Dcart
What are different between marketplace store and 3dcart.com?
3dcart.com and marketplace both are different things. For Examples Amazon, eBay and other web store is a marketplace where you can sell your products by listing. But 3dcart.com is an eCommerce platform that helps to create, design, and manage websites.
Process to setup store on 3dcart.com
1 . Go to 3dcart.com Seller
2 . Get an account on www.3dcart.com: Signing up takes few seconds, and for starters you’ll only need a free trial account to play around before paying after 15-day free trial ends.
——————————Registration form——————————
Registration Form Part 1.
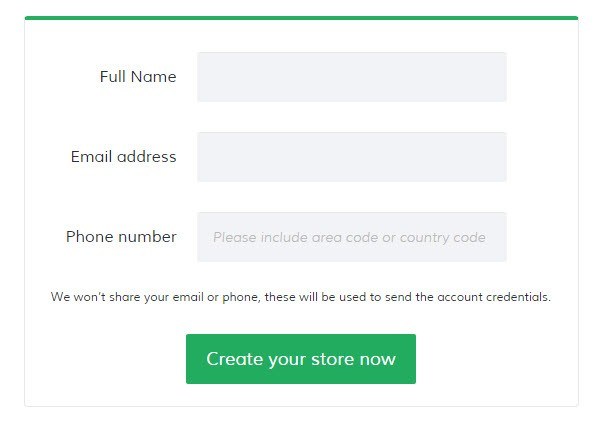
Registration Form Part 2.
After successfully setup store you need to manage your store or website.
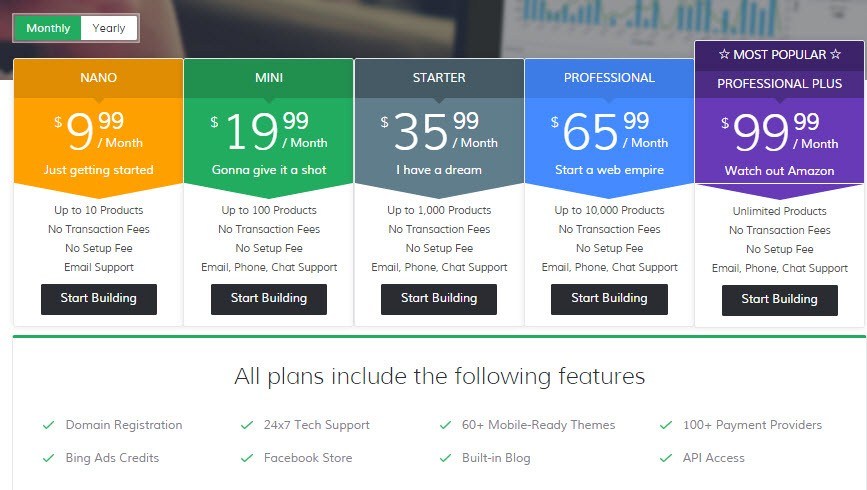
Choose Plan.
Note: Please select one of the plan according to your need.
How to manage your 3dcart store
Now we are going to describe all dashboard menu option one by one. Please see below mention screenshot for more help.
Mega Menu
Order Menu:
After an order has been placed by a customer, you have the ability to modify the order by adding or removing products as needed. It is important to note that after an order has been made, you will need to manually refund/charge the customer through your payment gateway to accommodate for the changes made.
Product Menu:
Using Products menus you can list a products on 3dcart by clicking on Add product button and you also export and Import the listing file.
Add Product: You can add a products manually by clicking on “Add Products”.
Export: You can download CSV file for all listing which are on the website or database.
Import:You can upload products in bulk through csv file.
Products > Product List:
To manually add a new product:
- Go to Products ->Product List
- Look to the top right of the page and click on the “Add a Product” button
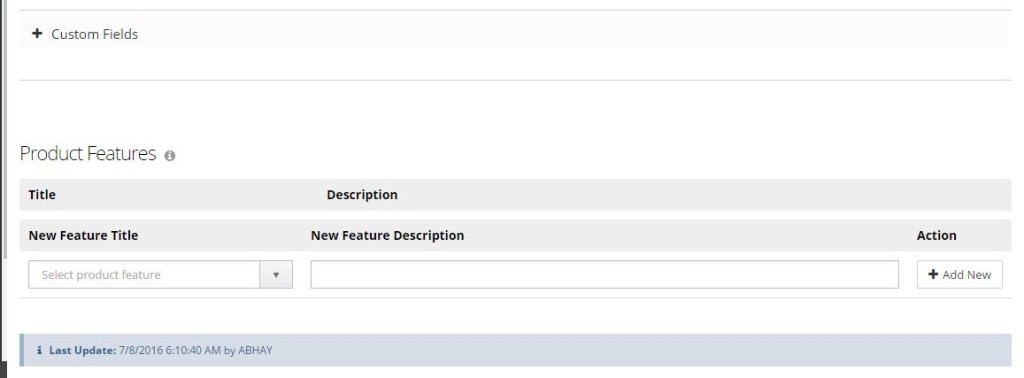
Add Product: This will create a base product for you to edit with your details. You will see a page with a series of tabs found along the top. The very first tab you see will be the information tab which will be the focus of this article.
In the information tab, you will see the following fields:
- ID/SKU:This is the item’s Store Keeping Unit and is your store’s unique identifier for the product.
- GTIN:This is the product’s Global Trade Identification Number and is typically the universal identifier for the product. For example, the product’s UPC number could be considered a GTIN.
- MPN:This field can be used for the product’s Manufacturer Part Number if applicable to the item
- Name:This field will be used for the product’s name as you would like it to appear on the store front.
- Short Description:This field is used to provide a short summary of the product’s description. It typically will appear on search results when a search is made on your store front.
- Manufacturer:Use this drop down to assign the product to one of your store’s product manufacturers if you have created them.
- Distributor:Use this drop down to assign the product to one of your store’s distributors if you have created them.
- Categories:Choose an existing category to add this product to in the Category field by clicking +Add, then selecting the category. You can choose more than one category to add this product to.
- Pricing: This section will allow you to set your product’s pricing (Cost, Retail Price, and Price. On Sale) Information.
- Options: This section will allow you to set some individual display and function parameters for the product. Non-Taxable, Not for Sale, Non Searchable, and Hide Gift Certificate and more.
- Shipping Options: Here you will see some configurations for the product that pertain to the way shipping is calculated when the item is purchased. Like Ship/Markup, One Box/ Multi Boxes, Weight/Length/Width/Height and other more.
- Inventory Options: This section can be used for setting how inventory control is handled for the product. Like stock, Out of Stock, Back Order, Waiting List, New Stock, and Stock Alert.
- Description: This field will allow you to enter an extended description of the product. The description will appear on the product’s listing page in your storefront. This field will take either straight text or HTML coding to format your description. Furthermore, you can use WYSIWYG on this field to help you format the text as needed.
- Keywords:Words and phrases entered here will be added to the product listing page’s Meta tags section and will assist in searches and SEO. Multiple keywords and phrases should be separated by a comma.
Note:Once you have completed setting up the product’s information tab, click “Save” at the top right to commit your changes.
Products > Categories:
In the categories tab you manage categories. You can create new categories, sub-categories and also you can edit or delete exiting categories.
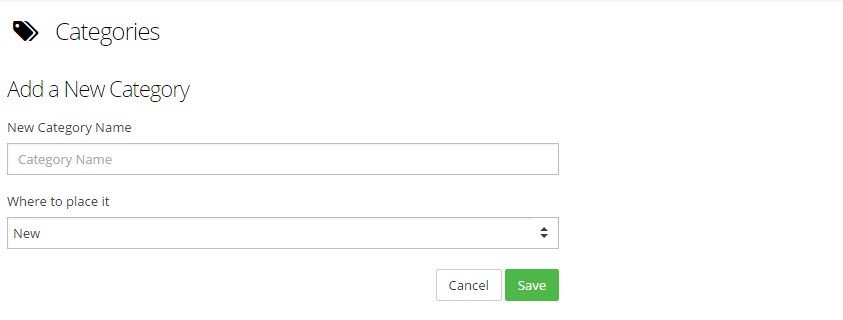
For creating a new category you need to click on +Add new then fill the new category name and select New in “Where to Place it“.
After this click on save button.
Please see below mention screenshot for more information.
For creating Sub-categories you need to click on setting icon of main category and then click on “Add subcategory” and fill the subcategory name and click on ok to save.
Please see below mention screenshot for more clearance.
Products > Images:
By using this section you can uploaded or delete images and also you can rename the images.
Products > Product Reviews:
By using this section you can see and manages your products and reviews and rating.
Customers > Customer List:
You can add new customer by clicking on “Add Customer”. Also you can export/import customer details by clicking on “Export/Import”.
Customers > Manage Groups:
If you want to manage customer in different different group.
Go through Costumers then click on manage groups and then click on “Add a New Group”
After this you need to fill the New Group, New Group, Minimum Order, and Price Level and click on the “Save”.
Customers > Gift Registry:
Gift registries make preparing for life’s big events easy. Whether your customer is preparing for the arrival of a new baby or a June wedding, gift registries are an essential for today’s shoppers, which allow a selection of desired products to be easily shared with friends and family.
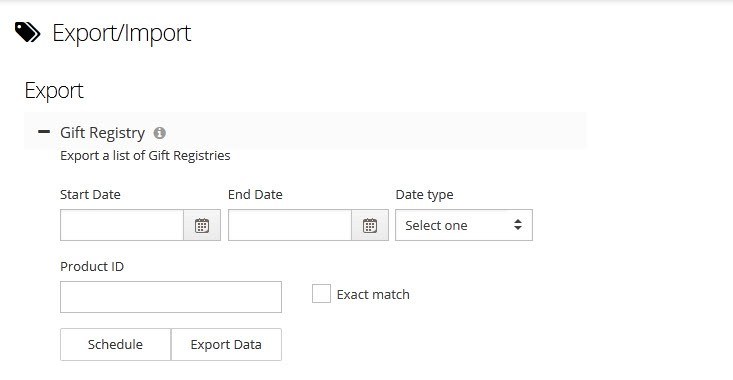
For Gift Registry click on “Export” and fill the required information.
Marketing > SEO Tools
Mastering Search Engine Optimization (SEO) is one of the most daunting tasks in ecommerce Store management. Fortunately 3dcart makes this easy to manage with our built in SEO tools.
3dcart merchants have an area of the 3dcart online Store Manager solely dedicated for the various SEO functions and settings available to your 3dcart powered ecommerce store.
This area can be accessed by going to Marketing ->SEO Tools
In this section you can manage Custom File Names, Enable Canonical URLs, Robots.txt, and Hide Category Header/Footer from Pagination, Sitemap, Redirects, Meta Tags, Social Links, and Meta Tags.
Marketing > Like Button
Facebook Like Button: The “Facebook Like” button enables users to make connections to your pages and share content back to their friends on Facebook with one click. Since the content is hosted by Facebook, the button can display personalized content whether or not the user has logged into your site. For logged-in Facebook users, the button is personalized to highlight friends who have also liked the page.
Marketing > Social Bookmarking
Social Bookmarking: Share your products and promotions anywhere and boost traffic back to your site. It only takes seconds to install “Add This” social bookmarking tool and it’s free! Social Bookmarking allows visitors to bookmark products and share with their friends via Facebook, Twitter, Digg and more.
Marketing > Promotion Manager
Promotion Manager: Drive traffic and increase sales with enticing promotions. Use the Promotion Manager to offer exciting discounts like Buy 1 Get 1 Free, a percentage off a specific product(s), a coupon code for a flat discount, free shipping, and much more.
Marketing > Auto responder Campaigns
Auto responder Campaigns: Increase conversions with automated emails. Auto responders allow you to send follow-up emails based on the parameters of your choice. Offer a complimentary discount to customers who’ve just made a purchase, cross-sell related products, and much more.
Marketing > Newsletters
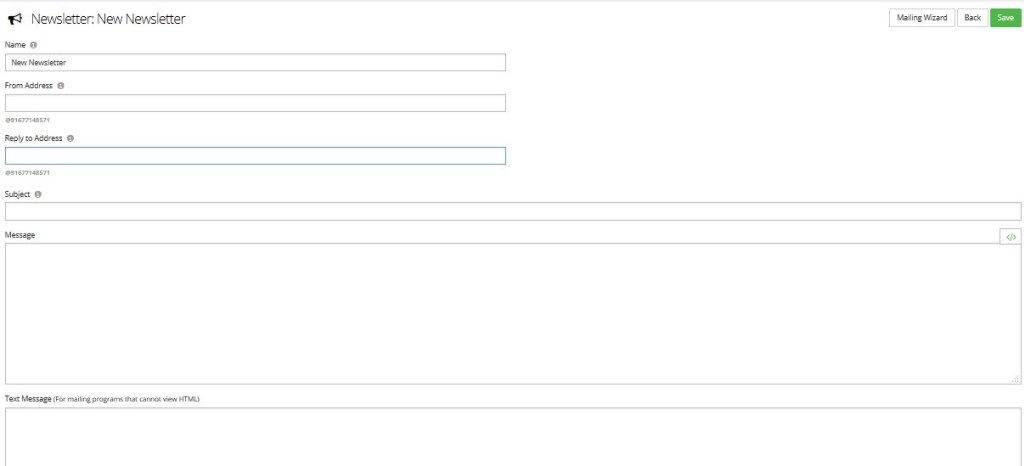
Promote your store and engage customers with email marketing. Newsletters help you build relationships, capture new leads, and establish yourself as a trusted industry expert.
For creating a newsletters you need to click on “Create a Newsletter” and fill the required information. Please see below mentions screenshot.
Marketing > Group Certificates
Group Certificate: Import/Export your bulk coupons to a Group Certificate Campaign for easy management.For Creating a coupon campaign click on “Create a coupon campaign”.
Marketing > Group Certificates
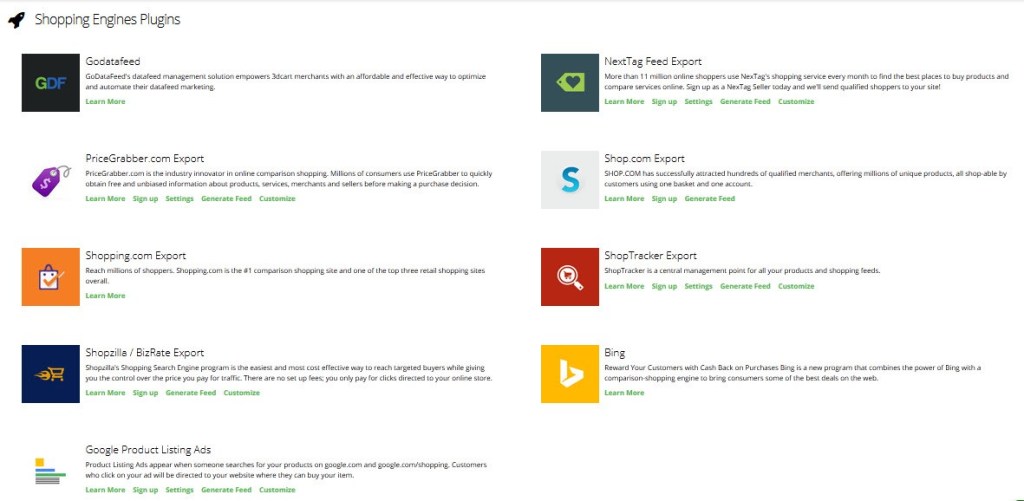
3dcart store has the ability to generate (and in some cases upload) feeds formatted for several different shopping engines like ShopZilla, Google Product Listing Ads and more. If you want then go through Shopping Engine Plugins.
Please see below mention screenshot for more clearance.
Content>Blog
3dcart’s built-in blog feature allows you to create a blog within your store with just a few clicks. The Blog automatically uses the dynamic design elements from the website, eliminating the need of re-creating the design elements on a third party location; automatically increase your SEO efforts by having the Blog within the same domain name as the website and store.
To create your blog, you must first create a link to your blog.
- Click on “+Add” as either a Menu Link or Extra Page
- Specify the name of your link (Blog, My Blog, etc.)
- Once created, click on the new link’s “Content” button
In the “link” field, enter blog.asp and click “Save Changes”
Content > Site Content
In the Site Content section, you create and/or edit content pages. Content pages, are all other pages on the website not related to products and categories, such as main menu pages like Home, About Us, Contact Us and additional content pages such as Terms and Condition, and FAQs.
Please see blew mentions screenshot.
In the “link” field, enter blog.asp and click “Save Changes”
Content > Header & Footer
If you want to set your store’s name, logo, slogan, and add content to the global header, footer and left/right banners.
Please see blew mentions screenshot.
Content > Titles & Content
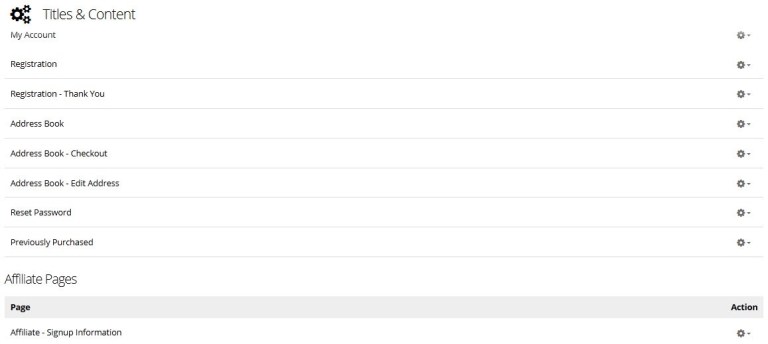
The Titles & Content section is a great way to make changes to the layout of your main pages without editing the HTML templates. Functions available to you in the Titles & Content section include:
- Changing page Titles
- Hiding the left and right banner as well as the top menu on specific pages
- Adding Meta Tags to specific pages
- Adding content to the Header and Footer sections of individual pages
Please see below mention screenshot
Setting > General Setting > Store Settings>Store Tab
The Store Tab is the default tab that will be selected when first navigating to the page. It will contain the following settings:
Please see below mention screenshot for more clearance.
Setting > General Setting > Store Settings>Store Tab
- Store Information:Here’s where you’ll configure general information about your store. Your settings here are:
- Store Name:The name of your store or business. It will be used as the main title tag for all browser tabs as well as inserted dynamically in all store generated emails. Furthermore, if no logo is present on the store, the Store Name will be used on the store’s global header.
- Store Slogan:(optional) Here you can enter a slogan or catchphrase for your store. It will also be used for the main title tag on browser tabs. As with the Store Name, if no logo is present on the store, the slogan will appear below the store name on the store’s global header.
- Store Logo:This field will allow you to upload and select an image for the store’s logo. The logo will appear on the global header of each page and will also be used for HTML emails coming from the store. Note that if a logo is specified the Store Name and Store Slogan information will not be seen on the global header, but will still be used for the titles (on tabs) as well as emails.
- Email:The email entered in this field will be used as the FROM email for the various notifications (password reminders, CRM ticket notices, etc) sent to you and your customers from the store. Ideally, this email address should be something @yourdomain since it will be seen as your store’s main email address when messages are received and to also avoid SPF conflicts. Click here for more information.
- Store URL: This will be the URL that the store uses during viewing of the non-secure pages (home page, product listings, blog, etc). Typically this will need to be set as your domain name if the DNS is pointed to 3dcart.
- Secure URL:This will be the URL used during viewing of secure store pages (login, my account, checkout, etc) via HTTPS. Typically, this will be whichever domain name you have an SSL certificate installed for. If you do not have your own SSL, then it will be the *.3dcartstores.com URL. If you would like to have the secure URL reflect your domain as well, you will need to purchase your own SSL certificate and have it installed on the store. Click here for more information
- Merchant Information:Here’s where you’ll enter the store’s Company Information including street address and phone contact information.
- Company Name, Address, and Phone numbers:This information will appear on your invoices and emails generated by the store. The contact information entered here will also appear on your store’s “Contact Us” page.
- Invoice Logo: This section of the Store tab will also contain an area for your store’s invoice logo which will allow you to specify the version of your store’s logo that will appear on invoice emails and pages.
- Store Standards: The Store Standards section will allow you to control regional settings of your store. Your settings are:
- Store Time Zone (GMT/UTC):This is the time zone you will be specifying on your store’s order timestamps. When viewing your actual order invoices, the time stamps will reflect this time zone specification. Please click here for more information.
- Currency Symbol: Use this field to specify the desired currency symbol for your store. (i.e. $, or )
- Decimal places on price: This new feature will allow you to designate how many decimal places your product prices will contain. This can be useful if your products are small products that have fractional values ($0.045) but must be ordered in bulk.
- Currency Code:Use this drop-down menu to select the standard 3 letter currency code that will be used for your online payment gateway. For example: USD US Dollar, CAD Canadian Dollar, EUR
Setting > General Setting > Store Settings>Product Display
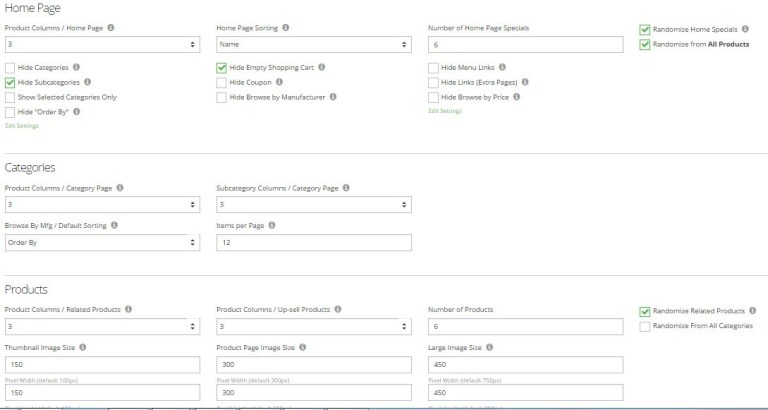
The Product Display tab will contains settings that control certain display aspects of your store’s products. Please see below mentions screenshot.
- Home Page:These settings will control certain aspects of the products as they appear on your store’s home page.
- Product Columns / Home Page: Use this to set the number of columns that will be used to display your items marked as “Home Specials.”
- Home Page Sorting: This field will specify the default sorting for the products listed on your home page as “Home Specials”
- Number of Home Page Specials: How many items will be displayed on the home page as “Home Specials”
- Randomize Home Specials: This setting will allow you to randomize the products that will display on your home page when they are configured as “Home Specials.” Each time the page is refreshed, a different set of home special products will appear. To enable it, simply mark the first checkbox.
- Hide Categories: This checkbox will hide your categories from the navigation menus on your pages.
- Hide Subcategories: Similar to the above, however this option will hide only the Sub-Categories from your site.
- Show Selected Categories Only: This would hide the sub-categories from navigation, unless the parent category is selected.
- Hide Empty Shopping Cart: When browsing your site, a customer’s view of the store will include a navigation bar element that shows how many items are present in their cart. If no products are chosen, the navigation element will read “Shopping Cart is Empty.” This setting will hide the notice if there are no products in the cart.
- Hide Coupon: On the shopping cart preview page, your customers can add a coupon (from a promotion or gift certificate) and apply it to the order. This settings will hide the coupon field from the customer.
- Hide Browse by Manufacturer: Use this option if you’d like to hide the manufacturer browse option from your site’s navigation bar. (Only will work if you have manufacturers specified and products linked to them.)
- Hide Menu Links: Use this setting if you’d like to hide the menu links at the top of your pages.
- Hide Links (Extra Pages): If you have any extra pages specified in your store’s “Site Content” section (Settings
- Hide Browse by Price: This option will hide the “Browse by Price” function from your store’s navigation bar menu
- Edit Settings: Use this link to edit the price ranges for the Browse by Price function.
- Hide “Order By”: When viewing category pages, your customers can sort the category views by Price (“Low to High” or “High to Low”), Newest, or Name. Marking this checkbox will hide this option altogether.
- Edit Settings: Use this link to edit the “Order by” options as needed.
- Categories: These settings will control certain aspects of the products as they appear on your store’s categories.
- Product Columns / Category Page: Use this to set the number of columns that will be used to display the items listed in your individual categories.
- Subcategory Columns / Category Page: Use this field to specify how many columns will be used to display your category’s sub-categories.
- Browse by Manufacture / Default Sorting: This field will specify the default sorting for the browse by Manufacturer page.
- Items per Page: This will control the default number of items that will display on your category pages before the page is split into page number navigation. (e.g. page 1, page 2, etc)
- Products: These settings will control aspects of the way individual products are displayed and shown
- Product Columns / Related Products: Use this setting to control how many columns will be displayed when specifying related items on your product listings.
- Randomize Related Products: Similar to the Random Home Specials option, but this one will apply to your related products. To enable it, simply mark the checkbox.
- Product Columns / Up-sell Products: Use this setting to control how many columns will be displayed when specifying Up-Sell items on your product listings.
- Thumbnail Image Size: Use these fields to determine how your product thumbnail images will be re-sized (in pixels).
- Product Page Image Size:Use these fields to determine how your product listing images will be re-sized (in pixels).
- Large Image Size: Use these fields to determine how your main images will be re-sized (in pixels).
- Enable Product Page Zoom: This setting will be used to determine which product image zoom feature you’d like to use when the product’s listing image is clicked. Your choices will be 3DZoom feature available on all versions after 3.2 and “none” to specify no zooming.
- Hide preview/next on product page: This is the ability to have Previous and Next navigation links applied on product listing pages. This will allow navigation through the items also contained in your product’s category when viewing a product listing. Use this checkbox to hide/enable this feature.
- Hide options additional value: Use this checkbox if you’d like to hide any additional costs your individual product options may have. By default, this setting is set to show a price when the option has an additional cost to it.
- Hide options dropdown title: By default, when using drop down product options, the drop down will first list the option’s title as the first listing in the menu. For example, if you have an option for “Color” and the choices are red, blue, and yellow, the drop down will show the title of the option “Color” as the first listing in the drop-down box. Marking this checkbox will hide the option’s title from the drop down and favor the first option listing instead.
- Hide Advanced Options out of stock: When using Advanced Options with Inventory Control, this setting will hide the options when they are out of stock.
- Search: These settings will control aspects of your store’s search functionality and display.
- Product Columns / Search Page: This will control the number of columns used to display product listings when a search result is returned on your store’s search bar.
- Hide Search: Mark this checkbox if you’d like to hide the store’s Search bar function.
- Hide Quick Search: The search bar can also populate a listing of search results based on characters being typed into the search bar. For example, typing red will return a quick search list of red-shirt, red-hat, and any other products on your store that contain the word “red.” Marking this checkbox will disable the quick search function.
Setting > General Setting > Store Settings> Checkout Tab
The Checkout tab will contain settings for the way certain aspects of the store’s Checkout processes are displayed and function.
View Cart: These settings will let you control how recommended items will be shown on the view cart page.
- Product Columns / View Cart:If you’re using the “Items on View Cart” option this setting will specify how many columns the related/recommended items use for display.
- Items on View Cart:Use this to display “Related Items” on the view cart page.
- Number of Products:This will let you specify how many “Related Items” will be displayed.
- Product Columns / My Account:This setting will specify how many columns the related/recommended items will use for display on the “My Account” page.
- Use Dropdown Image option as cart thumbnail:When using options with the dropdown image feature, this setting will take the selected option’s drop down image and add it to the “View Cart” pages to show which option was selected.
Checkout: These settings will let you control aspects of the checkout style and pages.
- Enable Single Page Checkout:In a normal checkout process, your customers are taken to the shipping screen to enter their shipping information and calculate their shipping costs. Then, they are taken to the billing page where they will fill out their billing information. This setting will allow you to use the single page checkout option. With single page checkout, both shipping and billing information tables will be presented on the same page. More information can be found here.
- Checkout Style: If you are using an HTML5 theme, you can select one of two separate checkout styles. Style 2 allows for a more streamlined look and feel to the checkout form
- Minimum Amount to Checkout:Use this setting to specify the minimum dollar amount the order should be before the customer can proceed to checkout. This is useful if you want to dictate a qualifying minimum purchase price for anyone buying your wares.
- Invoice Number:Clicking on the “Edit Invoice Number” link will allow you to set your store’s invoice number sequence for orders as they are placed.
- Invoice / Packing Slip Items Sorting:Use this drop down to control how your store’s order items are sorted on both the Invoice and Packing Slip print outs.
Setting > General Setting > Store Settings> Customer Tab
The Customer tab will contain settings that will be seen by your customers when they log into their respective customer account pages.
My Account: These settings will be used on the My Account page.
- Items on Account Page: This setting will allow you to display related items on your customer’s account screens when they log into their “My Account” page. To enable this, simply click on the checkbox.
- Number of Products: You can also use the text field to set the number of products displayed.
Login: These settings will be used when the customer logs into their respective customer record.
Requires Strong Password: This checkbox will require that your shoppers use a strong password when registering for a new account on your store. Password will need to be at least 8 characters long and must contain at least one number, one uppercase letter, and one lowercase letter.
On login fail redirect to: Use this field to specify a URL you’d like for your customers to be redirected to if/when their login attempt fails.
- Approve new customer registrations: When enabled, new customer registrations will be automatically approved. This applies to default (retail) customers that do not belong to any additional customer group.
- Enable Password Requirement for Site Access: Enabling this feature will close your site’s navigation globally for customers unless they first login into their respective accounts.
- Login Attempts before Show Captcha: Set the number of bad login attempts that will be allowed before the store prompts the user for a CAPTCHA verification.
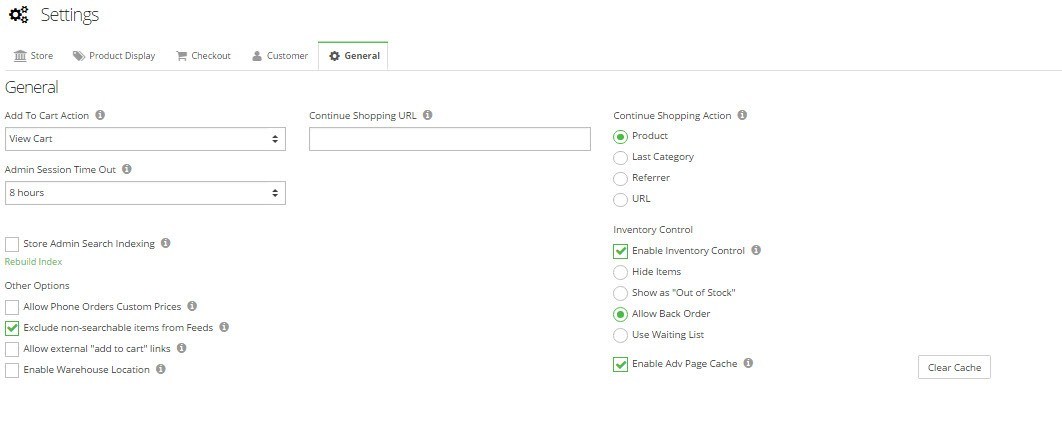
Setting > General Setting > Store Settings> General Tab
The General tab will contain options for your store’s general options
Add To Cart Action: Use this setting to specify what action is taken on the store when you shoppers click on the “Add to Cart” button. Your options are:
- None: No action taken
- View Cart: Shopper is taken to the view cart page
- Checkout: Shopper is taken directly to the checkout screen(s)
- Quick Cart: Shopper is presented with your cart’s Quick Cart pop-up screen.
Continue Shopping Action: This will control where the customer will be directed when they click on the “Continue Shopping” button from their “View Cart” page. Your choices are:
- Last Product: The product they just placed in their cart
- Last Category: The category they last visited before placing the item to their cart.
- Referrer: If the shopper was directed form a referring page, this option will direct them to it.
- URL: A specific URL (Perhaps to a different product or portion of your store) that you want to direct the customers to after they click “Continue Shopping.”
Admin Session Time Out: Set the amount of idle time that will pass before your Online Store Manager automatically logs you out.
Store Admin Search Indexing: Enabling this feature will enhance performance and accuracy of the internal Online Store Manager search functions specifically for stores with a large amount of products, orders, and/or customers. This will not effect the search function on your store front; only the search functions of the Online Store Manager itself.
Inventory Control: “Enable Inventory Control” Use this setting to have the 3dcart store track and manage your store’s inventory levels. Enabling this will also add an area for Stock numbers in your product’s Information Tab. You can then choose one of the following Inventory Display options for when the item’s stock level reaches “0.”
- Hide Items: When selected, this option will hide items if they reach 0 stock.
- Show as “Out of Stock”: Choose this if you’d like the products to show as “Out of Stock” when the stock level reaches 0. Customers will not be allowed to purchase product.
- Allow Back Order: Will allow back order of the item when its stock reaches 0. Customers willbe able to purchase item with the intention of having the product shipped to them when inventory is replenished.
- Use Waiting List:Choosing this option will let Customers add themselves to a waiting list when the item’s stock reaches 0. Customers will not be able to order item, but you can notify them when the item’s stock is replenished.
Setting > General Setting > Store Settings> General Tab
The General tab will contain options for your store’s general options
Setting> General Setting > Administrator Access
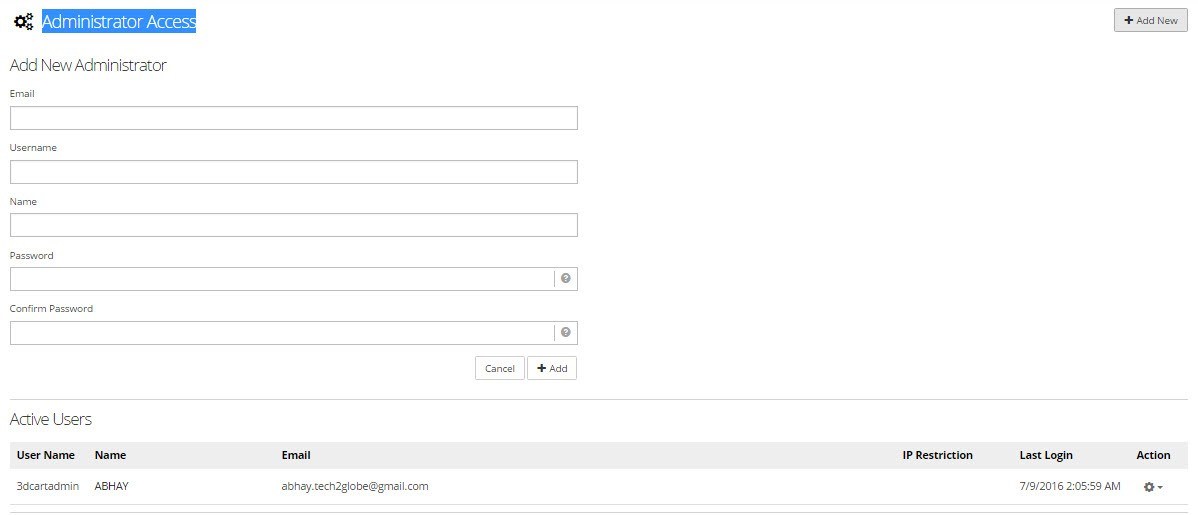
Administrator Access: This article will teach you how to add, delete, set IP restrictions, and set permissions for users for your 3dcart Administration panel. You are able to add as many users to your Online Store Manager as you’d like, as well as set specific access permissions for each individual. You can also change passwords for the users anytime you need.
If you want to add new user then Click the “+Add New” button at the top right. Please see above mention screenshot.
After clicking you need to fill account related information.
- Enter an email address for the user. This email address will be used to email them a password reset link in the event they forget their login password.
- Enter the Username for the account this must be 7 characters long, contain one number, and not contain any special characters or symbols
- Enter the user’s name. (This is for internal use.)
- Enter a password for the account this must be 7 characters long, contain one number, and not contain any special characters or symbols
- Confirm the Password.
- Click Add.
The user will be added, but you will still need to assign the access permissions for the user. Look for the newly added user and go to the far right of its listing.
- Click on “Action ->Edit” to continue
Setting Up User Permissions
For each one of the administrator accounts you can specify which areas of the Administration Panel they will be allowed to go to. For example, you may have a login created for your Webmaster and you need to restrict them from accessing your customer’s information. Alternately, you may want your sales staff personnel to have access to customers and orders, but not to design aspects of the site.
There are 3 predefined Permissions sets available at the top right of the page. These are:
Webmaster:
- Has access to the settings that control the look of the website and the Product Catalog.
- Does not have access to any Sales information or Customers accounts
Sales Staff:
- Has access only to the store’s orders information.
Full Administrator permissions:
- Has access to all areas in the Administration panel.
Click on either of these permissions sets to add them to the user and Save.
Security Questions (Optional):
Along with setting permissions for the user, you can also add an additional level of security by specifying Security Questions for the user.
To add your security questions, select a question from the available “Question 1” drop down, and use the text box immediately after it to provide the answer. Then, repeat these steps for all 3 security questions.
When requesting data information such as a password reset or unlock, the store will ask the user these questions.
In the next sections, we will discuss how to Delete users, Change User passwords when needed, and view the user’s activity logs.
Delete Users:
To delete a user from the 3dcart account:
- Go to Settings =>General =>Administrator Access
- Look to the far right of the user and click on the “Action ->Delete” button to remove them.
Change Password of User:
- To change the password of an existing user:
- Go to Settings =>General =>Administrator Access
- Look to the far right of the user and click on the “Action ->Edit” button.
- On the user’s page, look to the top right and click on “Reset Password”
Note: A password reset link will be sent to the user’s email address on file. When they receive this email they will be asked to enter their new password. Please be sure that the new password contains at least 8 to 12 characters, at least one CAPITAL letter, at least one lowercase letter, at least one number and no special characters.
IP Restriction:
If you have a Static IP with your current Internet Service Provider (ISP) then you can assign the IP Restriction to any of the accounts; this will only allow users from that IP address to login using the specific account credentials. Even with the correct username and password you won’t be available to login from a different location. Remember that if your IP is dynamic then you cannot use this option, applying the IP restriction will lock you out of your account.
- Go to Settings =>General =>Administrator Access
- Look to the far right of the user and click on the “Action ->Edit” button.
- Enter your connection’s IP address in the “IP Restriction” field
User Log:
At the top right of every user login page, you will see a button labeled “Log” (between “Reset Password” and “Save”)
This button will allow you to view specific user activity on your account. This can be useful for monitoring or tracking changes which may have occurred on the site.
Setting> General Setting > Distributors
Distributors: Use the Distributor feature to send automatic email notifications to your distributors.
Inter company name then click on “+add” button to add distributor otherwise click on cancel.
Setting > General Setting > Manufacturer
Manufacturer: Allow customers to easily browse their favorite brand names. Add Manufacturers to create a new level of navigation for your online store.
To add new manufacturers you need to click on “Add Manufacturers”. After this enter manufacturer name and then click on “Save”.
Please see below mentions screenshot for more clearance.
Setting > General Setting > Checkout Questions
Checkout Questions: Collect valuable information with Checkout Questions. Acquire important information during the checkout process.
Click on “Create Checkout Question” for creating checkout questions and fill the required information.
Please see below mention screenshot.
Setting > General Setting > IP Security
IP Security: Protect your online store with IP security. Maintain control and gain peace of mind with the ability to block specific IP connections and geographic locations.
If you want to block specific IP then first you need to click on “Block IP address”.
Setting > General Setting > IP Security
IP Security: Protect your online store with IP security. Maintain control and gain peace of mind with the ability to block specific IP connections and geographic locations.
If you want to block specific IP then first you need to click on “Block IP address”.
Setting > Design > Themes & Styles
You will see all of the various themes that are available for your store. To install a theme, simply click on it to open up its respective preview screen. Once you’re ready to install the theme, click on the “Install Theme” button. The 3dcart interface will download the theme and you’ll be asked if you’d like to apply the template. Clicking OK to this screen will effectively update your site’s live theme. Clicking Cancel will merely install the theme without applying it to the live site.
There are three screenshot in below please all for more help.
Most of your site’s colors and styles will be controlled by the Theme’s respective Cascading Style Sheet (CSS)
To modify your site’s current style sheet, use the following steps:
From your online Store Manager,
- Go to Settings->Design ->Themes & Styles.
- Click on the “Edit look/Color (CSS)” button located along the top right hand corner of the page
You will then see a listing of each style controlled by the style sheet. Clicking on the “Action ->Edit” button to any of these will allow you to make changes to the selected style itself.
After making your changes, click “Save” and review the changes on your site.
Setting > Design > Email
While we do our best to ensure the system generated emails have as much applicable information as possible, you may need to edit the email templates to suit your specific needs. Perhaps you’d like to change the layout of the emails, or maybe you’d just like to add/remove certain elemental portions of it.
Fortunately, as with many aspects of 3dcart’s look and feel, you have access to edit the email templates as needed.
To access and edit your store’s various email templates, go to Settings ->Design ->Emails and click on the “Actions ->Edit” button for the specific template you’d like to edit.
In this section we worked on “Affiliate Emails” , “Customers Emails”, “Gift Registry Emails”, “Orders Emails”, “Products Emails” and “Rma Emails”.
Setting > Design > Store Language
Store Language: Alternately, there’s the Settings ->Design ->Store Language section. This area will control approximately 97% of the labeling your store uses. For example, let’s say that instead of having the buttons read “Add to Cart” you’d like to have them to read “Add to Basket.” Store Language is your place.
You’d be surprised at the amount of information you can find in Store Language, so before editing any template, always check Store Language first. Some of the sections you can change include:
- Remove the Powered by 3dcart tag on your store’s footer.
- Change the default “Free Shipping” icon
- List your product features with individual tags instead of “Feature 1, Feature 2:” etc
- Much much more.
Alternately, the Store Language section is also where you’d go if you’d like to change the actual language of your site.
Please see below mention screenshot.
Setting > Design > System Messages
Your 3dcart Website has system messages already built in to warn, thank, or inform customers during certain situations on your online store. These system messages range anywhere from adding invalid credit card information to thanking them for signing up for the Mailing List. As with most functions in 3dcart, you have the ability to customize these messages to display whatever you want.
- Go to Settings =>Design =>System Messages
- In the Message field, edit the message you would like to display to the customer.
- In the Message field, edit the message you would like to display to the customer.
Please below mentions screenshot.
Setting > Design > Store
In this section we can access you store status.
- Close Store
- Close Checkout
- Open
Please below mentions screenshot.
Setting > Payment
Payment: With over 100 supported payment gateways, your online store can accept payment using Gift Cards, echecks, PayPal, Amazon Payments, Bit coins, and much more.
- Payment Methods: Select what methods of payment customers can use, like Authorize.net, PayPal, etc.
- Tax Manager: Specify automated tax rules based on an order’s “Ship to” zip code and/or create tax codes for specific products.
- Gift Certificates: Generate Gift Certificate codes for a specified dollar amount of your choosing.
- Credit Card Types: Add or delete the credit card types you’d like displayed during checkout, such as Visa, MasterCard, etc.
Please below mentions screenshot.
Setting > Shipping
Shipping: Easily manage the delivery of your goods with real-time rates, built-in tracking updates, and the ability to quickly print shipping labels.
- Easily manage the delivery of your goods with real-time rates, built-in tracking.
- Shipping Methods: Specify which shipping methods you’d like to offer your customers, whether real-time and/or flat rate shipping.
- Shipping Settings: Configure important shipping settings and select the shipping carrier you’d like to use for real-time rates.
- Edit Settings: Gain peace of mind by adding required or optional shipping insurance for orders over a certain value.
- Insurance: Gain peace of mind by adding required or optional shipping insurance for orders over a certain value.
- Handling: Add handling costs to your orders to cover the cost of expensive or special packaging supplies.
- Country List: Limit or expand the scope of your shipping by specifying which countries and states your store is willing to deliver to.
Please below mentions screenshot.
Report
In this section we can view and edit any regarding report.
Some are:
- Bussiness Reports
- Customers Reports
- Inventory Reports
- Marketing Reports
- Payment & Shipping Reports
- Products Reports
- Sales Reports
- Statistics Roports
Please below mentions screenshot.


